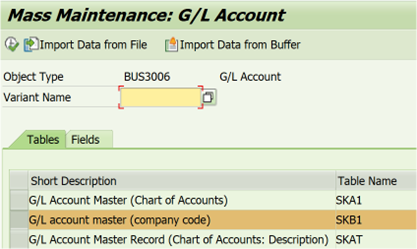
We have several blogs on the functionalities and process related to transaction ‘MASS’ for making massive changes to different objects. However, I thought of bringing out an article on this subject, that could highlight some of the hidden features of this powerful tool. Let us see how this can turn into a good utility tool.
In this blog, I am using examples from FI module, but the same is also applicable to all other modules. In the first place, this can be used as a query tool. For example, if we want to check certain details, in say table SKB1 (Comp Code GL Master data) there are some limitations. For example, if we want to get details for a combination of Company Codes and GL Accounts, it would not be feasible, as we cannot load exact mixture of Comp Codes / multiple GL’s. The extract would consider all Company Codes and all GL Accounts, and so, the output has to be further filtered in Excel to get the required details. However, using Mass, we can get the required details at one go. I am listing the steps involved for the same. The examples shown here are from table SKB1. However, the same thing holds good for Customer, Vendor, Materials etc., wherever applicable, without limitations.
Case 1: The idea here is to check the Field status Group in these seven-line items. (Different Comp Code and Accounts).
Step 1 : Prepare the details as shown below.
| MANDT | BUKRS | SAKNR |
| 110 | 0001 | 11995 |
| 110 | 0001 | 44997 |
| 110 | 1000 | 11996 |
| 110 | 1000 | 33995 |
| 110 | 2000 | 44999 |
| 110 | 3000 | 11996 |
| 110 | 3000 | 44995 |
This can be verified in MASS as follows. Please follow the screen prints and these are self-explanatory.
Step 2: Select second line as highlighted. The data that we want to check should be copied as ‘Ctrl+C’ and available in the clip board. Now click the ‘Import Data from Buffer’ push button.

In the following screen our required details will be displayed. These are now ready to do a further query.
Step 5 : Here, let us say, we want to check ‘Field status’ values. We select the required field and press Continue.
In the following screen, our required details are available.
Where as , if we pass the same details to Table SKB1, the Comp Code and Accounts have to be uploaded in two different fields and the out put will be as follows.
We get 22 line items instead of 7 and so, the data has to be further refined to get the exact details.
Step 6 : To download the details from MASS, right click as shown in the following screen and select print.
Step 7: Once we select “print’, the following output is available for download.
By the same way, we can also add more fields in the query and get to see details as shown in the next screen. So, this is a very useful tool.
Case 2: We pass many line items to the table, but part of the data is not available. Let us see, how it works through ‘MASS’.
Step 1 : Prepare a new set of details as shown below.
| MANDT | BUKRS | SAKNR |
| 110 | 0001 | 11995 |
| 110 | 0001 | 44997 |
| 110 | 1000 | 11996 |
| 110 | 1000 | 33995 |
| 110 | 2000 | 44999 |
| 110 | 3000 | 11996 |
| 110 | 3000 | 44995 |
| 110 | 2000 | 33892 |
| 110 | 2000 | 33893 |
| 110 | 0001 | 33992 |
| 110 | 0001 | 33993 |
| 110 | 3000 | 33999 |
Follow all the steps as in Case 1 and finally, we reach the below screen. Notice there are two sections; one each for available and non available data.
The unavailable line items are listed and from here, if we need to extend those items, it becomes easy to identify missing Accounts.
Trust this helps to take advantage of some additional utilities in the MASS transaction. For those not familiar with this transaction, please go through SAP Help or many blogs already available. 😊
J. Swaminathan
[ad_2]
Source link


